
My Profile
Manage your personal information, profile picture, email address, and password. Learn how to update your account details and control your access to different consumers.
Overview
Your profile contains your personal information and account settings. From this page, you can:
- Update your name and salutation
- Upload and manage your profile picture
- Change your email address (with verification)
- Change your password (with verification)
- View and manage the consumers you belong to
- Accept or decline invitations to join other consumers
Accessing your profile
- In the top right corner, click your name (e.g., "Doe Jane")
- Select My Account → My profile
- Your profile page opens with all editable sections

Editing your profile information
Updating your name
Your name appears in two parts: salutation and full name.
Steps:
- On the My profile page, find the "Overview" section
- Edit the following fields:
- Salutation — Your title (required, max 32 characters, e.g., Mr., Mrs., Herr, Frau)
- First Name — Your first name (required, max 64 characters)
- Last Name — Your last name (required, max 64 characters)
- Click Save
- Your name is updated in your user account and at your login provider
Note: Your name changes are synchronized with your login provider (Azure AD B2C). The update may take a few moments to appear everywhere.
Note: Contacts and employee records of a consumer are separate entries that the consumer's administrators maintain. They are not changed when you edit your profile name.
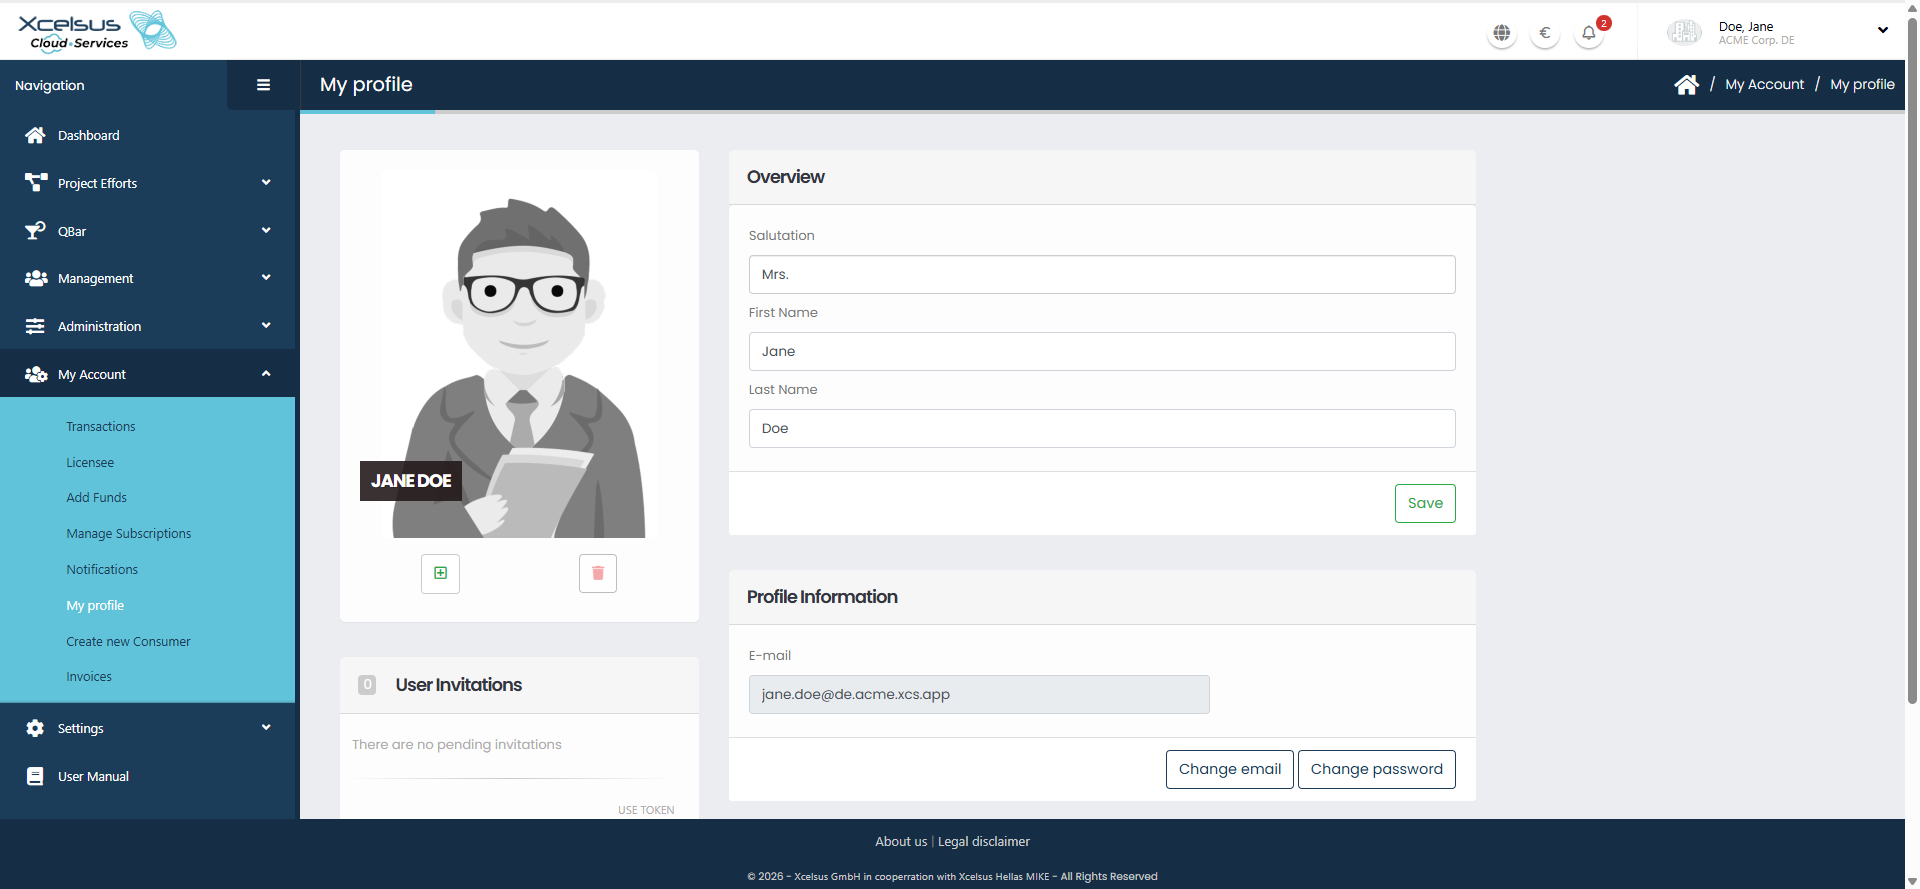
Managing your profile picture
Uploading a profile picture
Supported formats: JPEG, PNG, GIF, BMP, TIFF, WebP, HEIC
Max file size: 1 MB
Max dimensions: 1300 × 2000 pixels
Steps:
- In the Profile Picture section (left sidebar), click Upload Image
- Select an image file from your computer
- A cropping dialog appears — adjust the crop box to frame your face
- Click Crop to confirm
- Your profile picture is updated immediately and a confirmation message appears
Deleting your profile picture
- In the Profile Picture section, click Delete Image
- Your profile picture is removed and a confirmation message appears
- The system displays a default avatar instead
Changing your email address
Changing your email requires verification through both your current email and your new email address.
Steps:
- On the My profile page, find the "Profile Information" section
- Click Change Email
- A verification dialog appears:
- Enter your current email address to confirm your identity
- A verification code is sent to your current email
- Check your email inbox and enter the verification code
- Enter your new email address
- A verification code is sent to the new email
- Check your new email inbox and enter the verification code
- Click Confirm
- Your email address is updated
Note: Email changes are synchronized with your login provider (Azure AD B2C). You'll use your new email address the next time you log in.

If you don't receive a verification code
- Check your spam/junk folder
- Wait a few moments and request a new code
- Verify the email address is spelled correctly
Changing your password
Changing your password requires verification via a code sent to your email.
Password requirements:
- Minimum 8 characters, maximum 64 characters
- Must include at least 3 of the following: lowercase letter, uppercase letter, number, symbol
Steps:
- On the My profile page, find the "Profile Information" section
- Click Change Password
- A verification dialog appears:
- A verification code is sent to your email
- Enter the verification code
- Enter your new password
- Confirm the new password by entering it again
- Click Confirm
- Your password is updated
Note: Password changes are synchronized with your login provider (Azure AD B2C). Your next login will use your new password.

Password policy
Your password must:
- Be between 8 and 64 characters long (we recommend at least 12)
- Not start or end with a space
- Include at least 3 of these character types:
- Lowercase letters (a–z)
- Uppercase letters (A–Z)
- Numbers (0–9)
- Symbols (!, @, #, $, %, etc.)
- Not contain your name or your email address
- Not be easy to guess. Very common passwords, keyboard patterns and a common word followed by a few digits are refused (for example
Password1!,qwertz123!orTest1234$)
Example valid passwords:
Maple&River42!Secure@Pass99Blue-Tiger-Window-9
Managing your consumers
A consumer is an organization or business account you belong to. You can belong to multiple consumers.
Viewing your consumers
On the My profile page, the Consumers section (left sidebar) displays:
- All consumers you belong to
- Consumer logos/icons
- Options to manage your membership
Leaving a consumer
You can remove yourself from a consumer if you're not the sole owner.
Steps:
- In the Consumers section, find the consumer you want to leave
- Click Remove
- Confirm the action
- You are removed from that consumer
- You lose access to that consumer's data and features
Note: If you're the only owner of a consumer, you cannot leave it. You'll see the message: "You cannot leave this consumer as you are the only owner."
Managing consumer invitations
Viewing pending invitations
Invitations appear in the User Invitations section (left sidebar). Each invitation shows:
- The consumer's name and logo
- The date you were invited
- Accept and Decline buttons
Accepting an invitation
Steps:
- In the User Invitations section, find the invitation you want to accept
- Click Accept
- You are added to that consumer
- The invitation disappears from your list
Declining an invitation
Steps:
- In the User Invitations section, find the invitation you want to decline
- Click Decline
- You are not added to that consumer
- The invitation disappears from your list
Note: Invitations expire after a set period. If you don't accept or decline by the expiration date, you'll need a new invitation.
Using an invitation token
If you received an invitation token instead of finding the invitation in your list, you can use the token directly.
Steps:
- In the User Invitations section, click USE TOKEN
- Enter your Token and click Confirm
- If the invitation was sent to a different email address than the one of your account, the field Invitation email address appears. Enter the email address the invitation was sent to and click Confirm again
- You are added to that consumer
If the token cannot be used, the dialog shows one of these messages:
| Message | Meaning | What to do |
|---|---|---|
| This invitation token was not found. Please check it and try again. | The token is wrong, or the invitation no longer exists | Check the token and try again |
| This invitation was sent to a different email address than yours. Please enter the email address the invitation was sent to. | The invitation belongs to another email address | Enter the email address the invitation was sent to |
| The email address does not match the one the invitation was sent to. Please enter the email address the invitation was sent to. | The email address you entered is not the one the invitation was sent to | Enter the correct email address |
| You are already a member of this consumer. | You belong to this consumer already | Nothing to do |
| This invitation has expired. Please ask for a new one. | The invitation is no longer valid | Ask the consumer's administrator for a new invitation |
| This invitation can no longer be used. | The invitation was already accepted or declined | Ask the consumer's administrator for a new invitation |
Becoming a consumer owner
To create a new consumer or become a consumer owner, look for the "Become a consumer" button in the Consumers section (if you don't belong to any consumer yet).
See Understanding Consumers for more details on multi-tenancy and consumer ownership.
Troubleshooting
"Password does not meet requirements"
Your password is too short or too long, doesn't include enough character types, contains your name or email address, or is too easy to guess. Requirements:
- 8–64 characters, no space at the start or end
- At least 3 of: lowercase, uppercase, number, symbol
- No part of your name or email address
- Not a very common or predictable password
Try a longer password made of unrelated words, like Maple&River42!.
"Verification code is invalid"
The code you entered is incorrect or has expired. Request a new code by clicking "Resend Code" (if available) or retry the email/password change process.
"Email address is already in use"
The email you're trying to change to is already associated with another account. Use a different email address.
"You cannot leave this consumer as you are the only owner"
You're the sole owner of this consumer, so you can't leave it. To leave:
- Transfer ownership to another member first, or
- Delete the consumer (if permitted)
Contact your organization's administrator if you need help.
Changes not appearing
Profile changes sync across the system, but may take a few moments. Try:
- Refreshing the page (F5 or Cmd+R)
- Logging out and logging back in
If changes still don't appear, contact **support@xcs.app** with:
- What you tried to change
- The date and time you made the change
- Your email address